• 0

Author: Ashley Jane

I Started Bedazzling My Vapes and Now I Get the Obsession

I Started Bedazzling My Vapes and Now I Get the Obsession
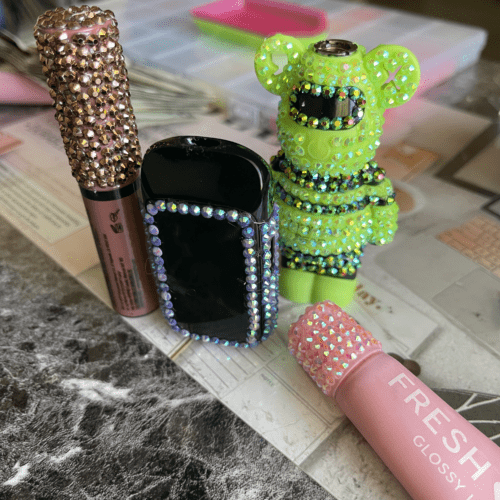
I did not start bedazzling because I had some grand plan to become a rhinestone person. I bought stones, glue and a few little tools because I wanted to make one of my vapes cuter, and somehow that turned into me looking at almost everything I own and wondering whether it needs crystals. Apparently this is how hobbies happen.

My first projects were mostly me trying to figure out how rhinestones even work on objects that were never designed to have anything glued to them. I knew I liked the look of fully bedazzled things, but actually sitting down with loose stones made me realize there is a lot more decision-making involved than “put sparkles on it.” What size stones should I use? Do I follow the shape of the object or create my own pattern? How close should everything be? What do I do when I get to a curve, a button or a screen? And how do people make those elaborate designs look intentional when I’m over here feeling accomplished because I made a straight line?

I’m still learning all of that, but I also understand the obsession now. There is something extremely satisfying about taking an ordinary object, spending way too much time staring at tiny rhinestones and ending up with something that looks completely different when you’re finished.

Disclosure: This article is for adults 21 and older. Some links in this post are affiliate links, which means I may earn a small commission if you make a purchase through them, at no extra cost to you. Any cannabis products shown are legal adult-use products from my personal collection, and all opinions are my own.

My First Bedazzled Vape Was Mostly About Getting the Stones On Straight

One of my first real projects was a purple Select Briq (shown above). It already had a shape and color I liked, so instead of trying to create some complicated design, I concentrated on covering the body neatly and working around the parts of the device that still needed to remain usable.

At that point, straight rows felt safe to me. I could understand them. Start at one edge, keep everything reasonably aligned and work my way across. The harder part was figuring out what happened when the surface stopped behaving like a flat piece of paper. Vapes have curves, seams, screens and little areas where a perfectly straight row suddenly does not fit anymore.

That was probably my first lesson in why bedazzling looks easier on Instagram than it feels when you actually have tweezers in your hand. You’re not only placing rhinestones. You’re constantly making tiny decisions about spacing and direction, and one slightly strange gap can become the only thing you see once you notice it. I still liked the finished vape, though, and that was enough to make me want to keep going.

Then I Started Understanding Why Rhinestone Sizes Matter

Before I started doing this, stone sizes were basically meaningless numbers to me. SS6, SS10, SS12 and everything in between sounded like information for people who already knew what they were doing.

Once I started actually placing them, the reason for having different sizes made a lot more sense. Larger rhinestones cover space quickly and make a project feel dramatic, but they are not always going to fit neatly around curves or into the little gaps that appear between rows. Smaller stones give you more control in those awkward areas and make it easier to fill space without forcing a big stone somewhere it clearly does not belong.

That also changed the way I look at other people’s work. What initially looks like a perfectly uniform surface usually has much more going on when you look closely. There may be several stone sizes working together, especially around edges and curves, and that is part of what makes the finished design look dense instead of leaving obvious holes.

I’m still figuring out which sizes I naturally reach for the most, but I stopped thinking I needed one perfect rhinestone size for an entire project. Mixing them when the shape calls for it has made much more sense. Once I get this figured out, I’ll start organizing a premium collection with better rhinestones.

The Lookah Bear Made Me Think More About Composition

The green Lookah Bear vape battery was a different problem because it already has so much personality before you touch it. There are ears, a face, a screen and several different shapes competing for attention, so covering the entire thing in one identical rhinestone treatment would have been a very different project from doing a simple vape body. This is also where I started thinking more about composition, even though that word sounded much fancier than what I felt like I was doing.

For me, composition has really just meant deciding where I want your eye to go when you look at the finished piece. If every single surface is covered with the same stone in the same way, the entire thing can start blending together. Using different stones or leaving certain areas alone can make the existing shape of the object part of the design instead of something I am trying to hide.

I’m definitely still learning that part. I’m not someone who can sit down and casually sketch an elaborate rhinestone pattern from memory, and that used to make me feel like I was limited to rows forever. I’m starting to realize I don’t have to begin with a complicated drawing. I can work with the shape that is already there, choose a few places I want to emphasize and let the design develop from that. As evidenced from the photo, I’m still working out how I want my Lookah Bear finished product to be.

My MWAH Vape and Lip Glosses Is Where It Started Feeling More Like My Style

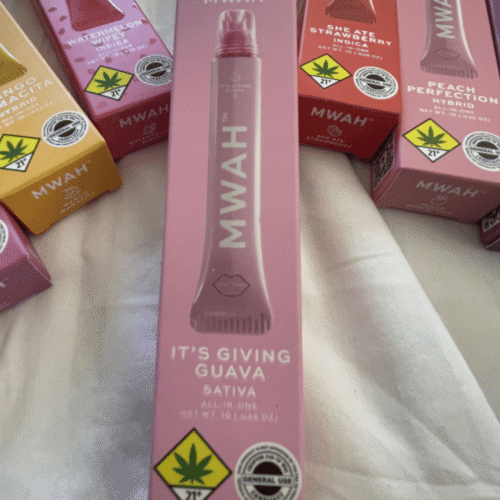
When I customized my pink MWAH It’s Giving Guava vape, I did not want to cover the entire thing. The original device already looks like a lip gloss tube, and the pink body is a huge part of why I liked it in the first place. Covering every inch in rhinestones would have taken away the part of the design that made me want it.

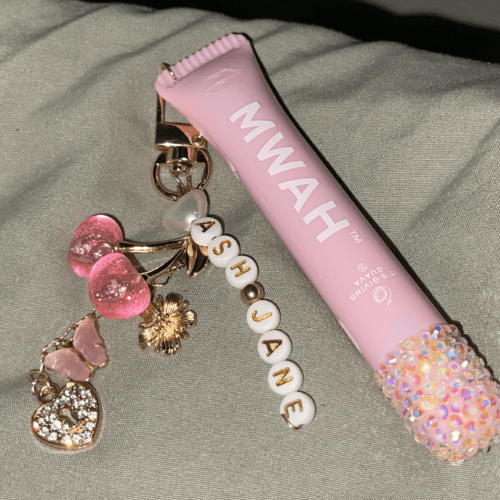
Instead, I added pink and AB rhinestones along the bottom and made a charm with gold hardware, glitter cherries, butterflies, pearls, a heart lock and an ASHJANE bead strand. The rhinestones became an accent instead of the entire object.

That project probably feels the most like where I want my bedazzling to go because it looks customized without losing what the original product was. I still wanted someone to look at it and immediately recognize It’s Giving Guava. I just wanted mine to look different from everyone else’s. I also wrote a full review of the actual vape in my MWAH It’s Giving Guava review, because the fact that I covered part of it in rhinestones has absolutely nothing to do with whether the cannabis inside is good.

B7000 Has Been My Starting Glue, but I’m Still Experimenting

The bedazzling kit I bought came with B7000 glue, so that’s what I’ve been using while I learn. It has held my rhinestones well so far, but once I started researching adhesives more closely, I found that B7000 isn’t necessarily everyone’s first choice for rhinestone projects. Other options that come up often are Aleene’s adhesives and Gem-Tac, so once I finish the B7000 I already have, I want to try something different and see what actually works better for me.

The bigger learning curve so far has been the application itself. Too much glue can spread beyond the stones and leave you trying to clean around tiny crystals, while too little creates the obvious problem of stones not staying where you put them. I’m getting better at applying a smaller amount to the section I’m actively working on instead of covering a large area and then racing to place everything before the glue starts setting.

I’m especially curious to see whether another adhesive gives me more control, dries cleaner or makes placement easier. I’m not at the point where I can tell anyone which rhinestone glue is “best” because I’ve only used B7000 myself. I’d rather finish what I have, test the alternatives and then compare them based on my own projects instead of repeating somebody else’s recommendation.

The Hardest Part for Me Has Been Designs

Placing rhinestones is not really the part that intimidates me anymore. Deciding what the hell I’m going to do with them is. I can follow a straight line. I can work around an edge. I can fill a section. What I’m learning now is how to move beyond that without turning every project into a random collection of sparkly things.

I used to think people who made elaborate bedazzled designs must be able to draw really well or somehow see the entire finished pattern in their heads before they started. Maybe some of them can, but I’m finding other ways to practice. I can start with a focal area, repeat a shape, use the natural lines of the object or work with a limited group of stone sizes and colors. That gives me enough structure to make decisions without requiring me to suddenly develop an entirely different artistic skill set.

It has also helped to stop judging every project against people who have been doing this for years. I can see things in my first projects that I would place differently now, but that is kind of the point. If everything looked perfect the first time, there would not be much to learn.

I Also Started Seeing Bedazzled Everything

One slightly ridiculous side effect of starting this hobby is that I suddenly notice rhinestones everywhere. Phone cases, bags, shoes, tumblers, makeup packaging, headphones, gaming accessories and random household objects all apparently became potential projects overnight. Some of that is probably because once your brain becomes interested in something, you start noticing examples that were always around you. Some of it is also social media realizing exactly what you stopped scrolling for and deciding you need 300 more versions of it.

It has made me much more interested in customizing things I already own instead of automatically looking for something new when I want a different look. Now I can look at something plain and start thinking about how I could make it feel more like mine.

That is probably the part of bedazzling I did not expect to enjoy as much as I do. The rhinestones are fun, obviously, but I like the process of turning an object into my version of it.

What I’d Do Differently If I Were Starting Again

I would buy a mix of rhinestone sizes and colors earlier instead of assuming I could make one size work everywhere. I would also spend more time thinking about which parts of an object need to remain functional before I start gluing anything. Screens, charging ports, seams, buttons and removable pieces can make a gorgeous idea extremely annoying if you realize halfway through that you covered something you actually need.

I would also stop trying to make every row perfect before moving on. Precision matters, but obsessing over one stone for ten minutes usually does not magically make the entire project better. Sometimes I need to place it, look at the design as a whole and adjust once I can actually see where the next stones are going.

Mostly, though, I would tell myself that beginner projects are allowed to look like beginner projects. I’m already making different choices than I made on the first vape, and that is much more useful than waiting until I somehow feel qualified enough to start.

I’m Definitely Not Done Bedazzling Things

At this point, I have enough rhinestones, charms and ideas floating around that the question is less whether I’m going to keep doing this and more what I’m going to attack next.

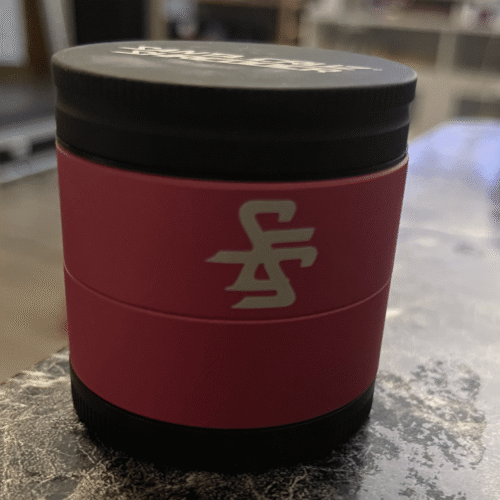
I already know I want to customize the top of my pink Santa Cruz Shredder at some point. I like the grinder exactly as it is functionally, but a plain black lid sitting on top of that bright pink body is practically inviting me to interfere with it. I also want to keep experimenting with projects that are not vapes because I don’t want bedazzling to become one extremely specific hobby where I eventually own twelve sparkling devices and nothing else.

For now, though, I’m enjoying being new at it. I’m still learning which stones I like, how to make designs feel intentional and how much glue is too much glue, but the finished pieces already feel more personal than the things I started with. And yes, now I look around my house and wonder what else needs rhinestones.

Try out some bedazzling! It’s been the best hobby I’ve tried so far. 
I Tried a Santa Cruz Shredder 4-Piece Grinder: Here’s What I Think

I Tried a Santa Cruz Shredder 4-Piece Grinder: Here’s What I Think

I’ve had the same inexpensive smoke-shop grinder in my weed setup for a long time. It gets the job done, but I’ve also gotten used to the little annoyances that come with it, like flower sticking around the edges, pieces not always turning smoothly and having to open it back up because some of the weed never really finished grinding. So when Santa Cruz Shredder sent me a couple of its aluminum grinders to try, I was curious whether I would actually notice enough of a difference to care.

Welp, I did.

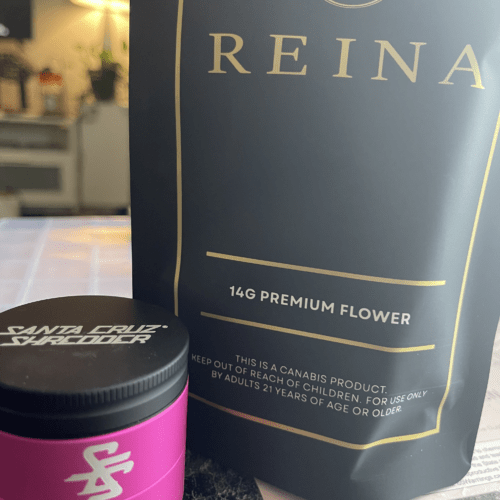
The pink 4-piece Medium grinder is the one I’ve been using regularly, and the difference showed up pretty quickly. It isn’t that Santa Cruz Shredder reinvented what a grinder does. It still has a very straightforward job. What I noticed is that almost every part of doing that job feels easier, from putting the flower into the top to opening the chamber afterward and actually having weed that is ready to roll.

Disclosure: Santa Cruz Shredder gifted me the grinders featured in this post. I was not paid to write this review, and all opinions are my own. They also provided the code ASHJANE10 for 10% off sitewide.

The Medium Is the One I Keep Reaching For

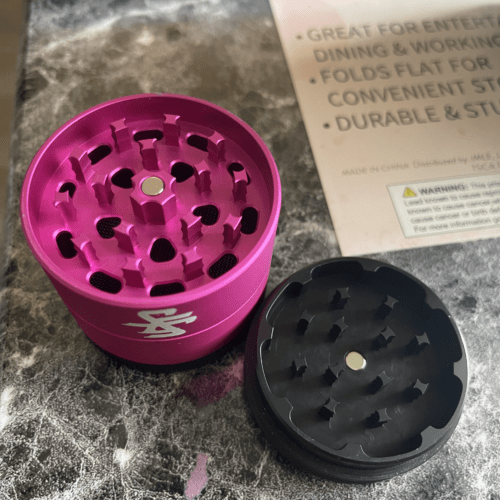
The one I’ve been using is the pink Aluminum 4 Piece Split-Series Medium Herb Grinder. The first thing I noticed before I even put flower in it was the finish. The outside has this really smooth, almost velvety feel that makes it noticeably different from the cheaper metal and plastic grinders I’ve used before. The sections also screw and unscrew very easily, which sounds minor until you’re using something all the time and don’t have to keep fighting with the threading.

I’m also very into the pink, although the Split Series itself probably wouldn’t be my first color combination if I were choosing purely by looks. A lot of the split colors are paired with black, and I’m not really a big black-and-color person. I’d love to see combinations like pink with purple or some of the brighter shades mixed together instead. That’s completely a style preference, though, and there’s a decent chance I end up bedazzling the top of mine eventually anyway.

It Actually Grinds the Flower the Way I Need It To

This is probably the most important part of the review because a grinder can feel expensive and look cute, but none of that matters if I still have to pick half-ground pieces out of it afterward.

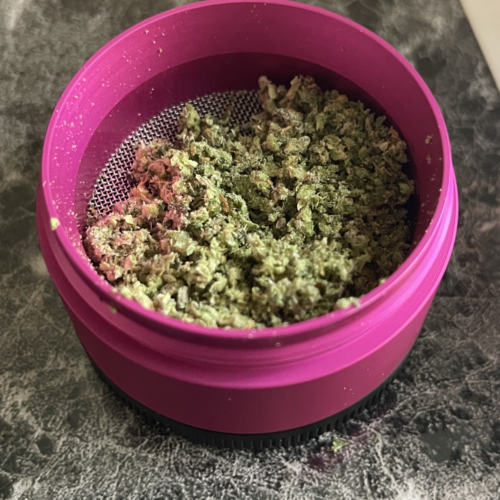
The Medium has been giving me a really consistent grind. I can put decent-sized pieces of flower into the top without having to break everything down into tiny pieces first, turn the lid a few times and have the flower fall through into the chamber without much effort. When I open it, I’m getting weed that is broken down enough for me to roll with right away instead of finding random larger chunks mixed through everything.

That has been one of the biggest differences from my longtime smoke-shop grinder. With that one, I can grind flower and still have pieces that somehow escaped the assignment, which means either pulling them apart manually or putting them through again. The Santa Cruz Shredder has been much more even for me, and I haven’t had the same sticky buildup around the inside afterward either. The flower moves through the grinder instead of feeling like half of it wants to stay attached to the teeth and edges.

The Chamber Is Huge Without Making the Grinder Feel Huge

The storage chamber is probably my favorite practical feature. It is deep enough that I can grind a good amount of flower at once and leave it in the grinder if I want to instead of immediately moving everything into another container. That makes it useful when I want to grind more than I need for one joint or prepare some flower ahead of time.

What I like is that the capacity doesn’t make the grinder feel oversized. There is a lot of room inside, but the Medium itself still feels compact enough to sit with the rest of my setup without taking over everything. The grinding area at the top is spacious too, so I don’t feel like I’m trying to squeeze flower into a tiny opening before I can even start.

The bottom kief chamber has also been nice to have. It collects underneath the screen on its own, and the little scraper that comes with the grinder means I can actually collect it without digging around with something that was never intended to be a kief tool. It is one of those simple additions that makes sense once you’re already using a four-piece grinder.


The Traveler Makes More Sense Once You Open It

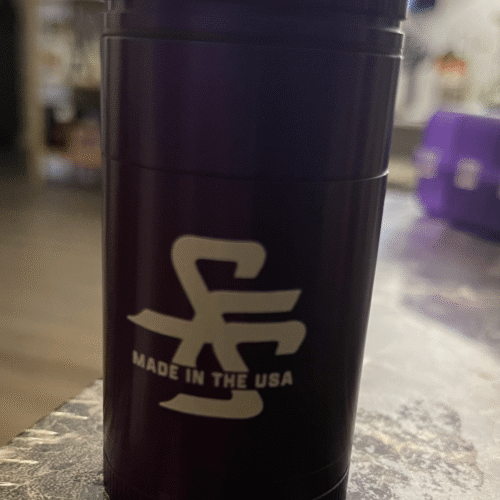
Santa Cruz Shredder also sent me the purple Aluminum 4 Piece Small Herb Grinder (Traveler). I haven’t actually used this one yet because when I’m out or traveling, I usually already have joints rolled or a vape with me. I have opened it and inspected it, though, and the part that surprised me is how much storage Santa Cruz managed to fit into something so narrow.

From the outside, it looks like a much smaller version of the Medium, but the chamber is surprisingly deep. That makes the design make more sense to me because portability usually means giving something up, and in this case, the storage space doesn’t feel nearly as compromised as I expected. If I were heading out with friends and we hadn’t had time to roll beforehand, this is the one I’d take because it gives me the smaller footprint I’d want without leaving me with a tiny amount of room for flower.

I also really like the purple. Between the two grinders, the Medium is the one I’m actually using right now, but the Traveler is probably the one that caught my eye first purely because of the color. I still wish Santa Cruz Shredder played a little more with brighter two-tone combinations instead of pairing so many of the Split Series colors with black, but that’s really just me wanting everything to be cuter than it technically needs to be.

What Feels Different From My Cheaper Grinder

The biggest difference between this and the cheaper grinders I’ve used isn’t one feature that suddenly makes everything else obsolete. It’s the fact that a bunch of small frustrations are missing.

I’m not having to fight with the threading every time I open a section. I’m not getting as much sticky flower caught around the teeth and edges. I’m not opening the chamber and finding larger pieces that never fully ground. I can fit more flower inside, and the grinder itself still feels compact enough that it doesn’t take over my setup.

That smoother experience is what makes it feel more premium to me. The material feels better in my hand, the flower moves through the grinder more evenly, and cleanup has been easier because I’m not dealing with the same amount of residue left behind.

If you only use a grinder every once in a while, I can understand not caring about any of that. A cheap grinder can absolutely still get the job done. But if you use one regularly, the little annoyances become a lot more noticeable, and that is where I think the Santa Cruz Shredder starts to justify itself.

Is the Santa Cruz Shredder Worth It?

For me, the Medium has been worth using because it has already replaced the grinder I was reaching for before. That’s probably the easiest way for me to judge it.

I like the size, I like how much flower I can fit into the chamber, and I like that the grind is consistent enough for me to go straight from grinding to rolling without dealing with half-ground chunks. The smoother finish and threading make it nicer to handle, but the actual performance is what matters more to me, and that’s where it has held up.

The Traveler is harder for me to fully review yet because I haven’t had a reason to use it outside the house, but the design itself makes sense. The deeper chamber gives it more usefulness than I expected from something that narrow, and I can see myself reaching for it the next time I need to bring a grinder with me instead of preparing everything ahead of time.

Would I Recommend It?

If you already know you want a four-piece grinder and you use flower regularly, I think Santa Cruz Shredder is worth looking at. The Medium especially makes sense if you care about having enough room to grind more than a tiny amount at once and want something that can also hold flower afterward.

I don’t think you need to convince yourself that every weed accessory has to be premium. Some things really can be cheap and functional. But this is one of those products where I noticed the upgrade because I use it enough to feel the difference.

If you’re still deciding what kind of grinder makes sense for you, I also put together a full weed grinder roundup comparing some of the other options I’ve used. That article is probably the better place to start if you’re still figuring out what size, material or price point you want.

If you decide to try Santa Cruz Shredder, they gave me the code ASHJANE10 for 10% off sitewide. As a stoner who likes premium cannabis accessories, I don’t think you would regret this purchase at all! 

MWAH It’s Giving Guava Review: I Actually Like This Sativa

MWAH It’s Giving Guava Review: I Actually Like This Sativa

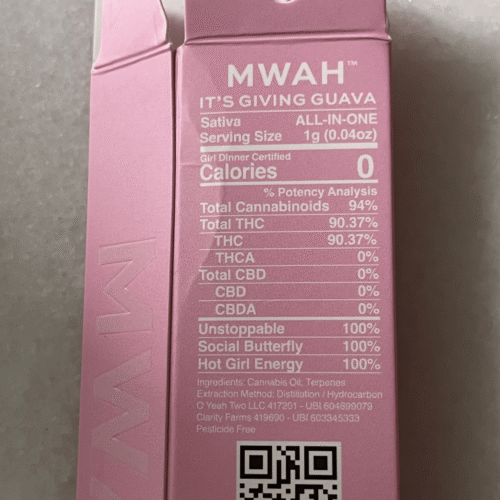
Quick summary: It’s Giving Guava is a sweet, tropical MWAH vape that has been surprisingly smooth for me and gives me an alert, functional high without the uncomfortable effects I sometimes get from sativas. Mine is a 1-gram rechargeable device with 90.37% THC, 94% total cannabinoids and 0% CBD. I originally bought it because I wanted the cute lip-gloss vape, but after actually spending time with It’s Giving Guava, I’d probably buy this one again even without the packaging.

I bought this product myself and was not paid or sponsored for this review. These are my personal opinions and experiences, and cannabis can affect everyone differently.

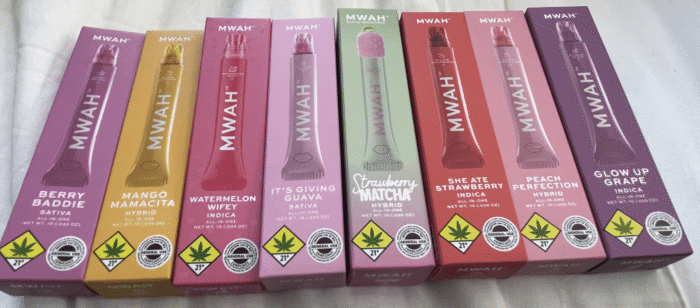
I originally got interested in MWAH because somebody made a weed vape that looks like lip gloss. That was more than enough to get my attention, and apparently enough to eventually convince me that I needed the entire collection. I ended up buying all eight MWAH lip gloss vape flavors, which I put together in my full MWAH vape haul and lineup post. But once I actually had the vapes, the packaging stopped being the only question. Looking cute can convince me to buy something once, but it can’t convince me that I actually enjoy using it.

It’s Giving Guava was the first flavor I really spent time with, and starting with a sativa made the whole experiment a little more interesting. I naturally gravitate toward indicas and indica-leaning hybrids because sativas can be unpredictable for me. I’m not completely against them, but I’ve had enough uncomfortable experiences that I tend to approach them with a little more caution, especially since I’ve noticed terpinolene doesn’t seem to agree with me.

I went into Guava expecting the pink tube and sweet flavor to be the parts I liked most. Instead, the high ended up being one of the biggest reasons I kept reaching for it.

What Is MWAH It’s Giving Guava?

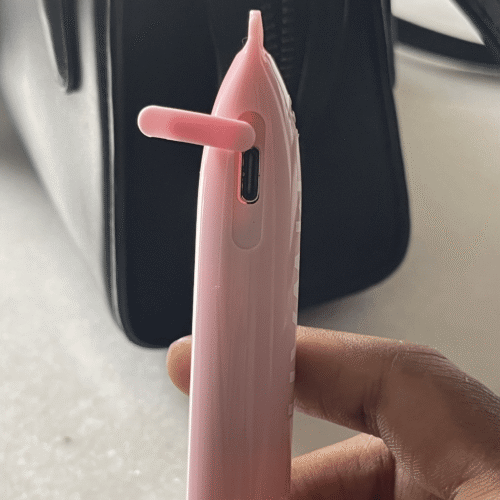
My It’s Giving Guava is a 1-gram rechargeable vape with 90.37% THC, 94% total cannabinoids and 0% CBD. The package lists cannabis oil and terpenes as the ingredients, and the device uses ceramic heating with a charging port on the side.

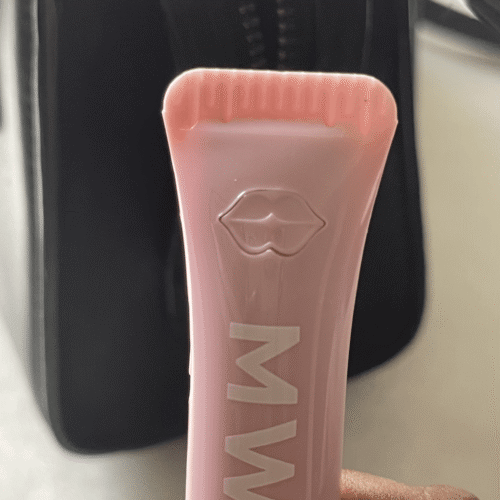
The lip detail at the end also doubles as the control button. Five clicks turns the device on or off, while two quick clicks activates the reheat function. Once it’s turned on, you can use it normally, but the power sequence is worth knowing before your first hit because it isn’t ready to use straight out of the package.

That design works well with the whole lip-gloss concept because the controls are built into the part that already looks decorative. There isn’t a random button on the side interrupting the look of the device, and you still get the usual basic vape controls.

What Does It’s Giving Guava Taste Like?

There is one slight problem with me reviewing how accurate a guava-flavored vape tastes: I have never actually eaten guava. I cannot tell you whether this tastes exactly like biting into the real fruit, and I’m not going to pretend I suddenly developed that knowledge because the package says guava.

What I taste is very sweet, fruity and tropical. It leans more toward a candy-like tropical flavor than anything that reminds me of flower, which makes sense considering the entire MWAH line is clearly going for a flavored experience. There’s a little sweetness left behind after I exhale, but it fades quickly enough that it hasn’t started bothering me after repeated hits.

I actually appreciate that because I’ve had flavored vapes where the first taste is good and the lingering flavor is what eventually ruins it. It’s Giving Guava gives me the sweet part while I’m hitting it and then mostly gets out of the way.

It is definitely sweet, though. Someone who dislikes fruit-forward or candy-like vapes probably isn’t going to suddenly love this because the device looks like lip gloss. For me, the sweetness fits the product and has been easy to keep coming back to.

It’s Surprisingly Smooth for Me

Smoothness was one of the first things I noticed because coughing is not exactly unusual for me. I cough with flower pretty regularly and I cough with plenty of vapes too, so I have a decent idea of what my normal reaction looks like.

With regular hits from Guava, I’ve barely been coughing. I even took some intentionally bigger hits because I wanted to make sure I wasn’t just naturally babying this vape without realizing it. If I really push it, I can still get a light cough, but even then it hasn’t been anything like what I normally experience with some other vapes or with flower.

That obviously doesn’t mean another person will have the same experience. Everyone reacts differently, and I’m only comparing Guava with what usually happens to me. The difference has been noticeable enough, though, that smoothness is one of the things I genuinely like about it.

It also makes Guava easier to casually use. I don’t have to mentally prepare myself for every hit to turn into a coughing session, which has made me much more likely to reach for it throughout the day.

The High Is What Really Surprised Me

The first time I deliberately paid attention to the effects, I was using It’s Giving Guava in the morning with my decaf coffee. I’m sensitive to caffeine, so I’ve had to accept the deeply unfair reality that I can love coffee while not really being able to depend on regular coffee for a morning energy boost. I still enjoy the ritual, though, and It’s Giving Guava ended up fitting into that part of my morning surprisingly well.

I felt high, but I also felt alert and interested in what I was doing. I was able to get into my day without gradually reaching that point where getting comfortable and doing absolutely nothing suddenly sounded better than whatever I had planned. I continued using Guava on and off throughout the day, and that functional feeling stayed pretty consistent for me.

That’s the part I appreciate most about this particular sativa. I don’t need every cannabis product to make me energetic or productive. Sometimes I specifically want an indica that makes being horizontal sound like an excellent decision. But there are also days when I want to get high and still write, work on something, go somewhere, clean something or generally remain involved in my own life.

It’s Giving Guava has fit that kind of day much better than I expected. I still feel the high, but it hasn’t come with the uncomfortable edge I’ve gotten from some sativas or the drowsiness I tend to get from heavier products.

That experience is also why I keep wanting more information about what is actually inside it. Of course, the effects could be different for different bodies, tolerances and personal sensitivities, so my experience with It’s Giving Guava isn’t a guarantee that everyone will feel alert, comfortable or functional after using it.

I Wish MWAH Told Me the Terpenes

My biggest information complaint with It’s Giving Guava and all of MWAH is that the package tells me it contains cannabis oil and terpenes but doesn’t tell me which terpenes are actually present.

I’ve become much more interested in terpene profiles because the words indica, hybrid and sativa don’t always predict how I’m going to feel. I already know from my own experience that terpinolene doesn’t seem to work particularly well for me, so enjoying a sativa this much naturally makes me curious about what its profile looks like.

I could guess that maybe limonene or some other combination is contributing to what I’m experiencing, but that would still just be a guess. I don’t have a terpene analysis for It’s Giving Guava, so I’m not going to assign it a profile based on how the high feels to me.

I just wish MWAH made that information easier to find. I’m planning to work through all eight flavors, and being able to compare their terpene profiles alongside the flavor and effects would tell me much more than simply knowing which ones MWAH labels sativa, hybrid or indica.

The Lip Gloss Design Still Matters

The fact that I like the actual vape doesn’t suddenly make the design irrelevant. The design is still why I noticed MWAH in the first place.

It’s Giving Guava comes in a soft pink tube with raised MWAH branding and a lip-gloss-shaped device inside, matching the design used throughout the rest of the collection. It genuinely looks more like something that belongs with beauty products than a traditional disposable vape, especially because the aesthetic carries over to the device itself instead of stopping at the outer packaging.

I ended up having a little more fun with mine and turned It’s Giving Guava into an accessory of its own. I made a charm with gold hardware, glitter cherries, butterflies, pearls, a heart lock and an ASHJANE bead strand, then added pink rhinestones along the top of the vape button. I left most of the original pink body uncovered because I still wanted it to look like It’s Giving Guava, just my version of it.

Obviously, none of that changes the cannabis itself, but it does explain why I think MWAH’s concept works better than putting a standard vape in a cute box. The device itself feels like part of the experience, and I actually enjoyed turning mine into something more personal instead of treating it like another disposable vape. The design got my attention, but actually liking It’s Giving Guava is what kept the whole thing from feeling like a gimmick.

Is MWAH It’s Giving Guava Worth Buying?

For me, yes. If I completely remove the novelty and ask whether I would recommend what’s inside the pink tube, the answer is still yes. The flavor is sweet and fruity without leaving behind an aftertaste I hate, it has been noticeably smoother for me than a lot of the cannabis I’ve been using lately, and the high gives me something I actually have a use for.

I particularly like It’s Giving Guava for the part of the day when I want to be high without feeling like the rest of my plans have been canceled. That morning with my decaf coffee ended up being a good example of why it works for me: I could enjoy both, feel the effects and then move on with what I needed to do instead of getting progressively sleepier.

That doesn’t make it the right vape for everybody. Someone looking for a heavy, sleepy effect probably isn’t going to get what they want from It’s Giving Guava, and someone who hates sweet, flavored vapes shouldn’t buy it just because the device is cute.

But if the question is whether It’s Giving Guava has anything going for it beyond looking like lip gloss, my experience has been yes.

Would I Buy It’s Giving Guava Again?

I would, and that’s probably the easiest way for me to rate it as of now while I’m still working through the rest of the flavors from my full eight-vape MWAH haul. When I decided to collect the MWAH vapes, I expected the design to be the fun part and the individual flavors to determine whether this whole thing became anything more than a cute collection sitting on my desk. It’s Giving Guava immediately made that more interesting because I did not expect one of the sativas to become something I genuinely wanted to keep around.

I bought It’s Giving Guava because I wanted the pink lip-gloss vape. I’d buy the next one because I actually liked what was inside it.

Want to Try MWAH Yourself?

MWAH is currently available through licensed retailers in Washington and California. If you want to see whether there’s a store near you, check the MWAH store locator here and then confirm the dispensary’s current menu before heading over, especially if you’re looking for a specific flavor.

Want to see the unboxing? I filmed a quick look at It’s Giving Guava for YouTube Shorts watch it here.

I Bought All 8 MWAH Lip Gloss Vapes: Full Flavor Lineup

I Bought All 8 MWAH Lip Gloss Vapes! Here’s the Full Lineup.

Quick summary: I bought all eight MWAH lip gloss vapes at Kemp Cannabis in Seattle, including the two newer flavors, Strawberry Matcha and Watermelon Wifey. I got mildly obsessed with the idea of a weed vape designed to look like lip gloss, and once I had that thought I couldn’t not own the entire lineup. Now I’m working through each flavor to find out if what’s inside the packaging actually holds up.

I bought all eight MWAH vapes myself and was not paid or sponsored for this post. Any opinions I share are based on my own experience, and cannabis can affect everyone differently.

I did it. I bought all eight.

When I first wrote about MWAH and my desire for the lip gloss weed vapes, there were six flavors on my radar. Somewhere between writing that post and actually buying anything, MWAH added two more: Strawberry Matcha and Watermelon Wifey. So naturally I then needed all eight.

I picked up the full lineup at Kemp Cannabis in Seattle, which had all eight flavors in one place, including both of the newer additions. That made things much easier than trying to piece the collection together across different dispensaries.

The Full MWAH Lineup

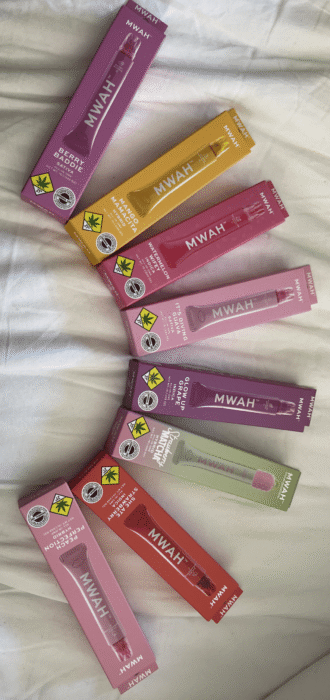
I bought one of each:

  • It’s Giving Guava
  • Berry Baddie
  • Mango Mamacita
  • Peach Perfection
  • She Ate Strawberry
  • Glow Up Grape
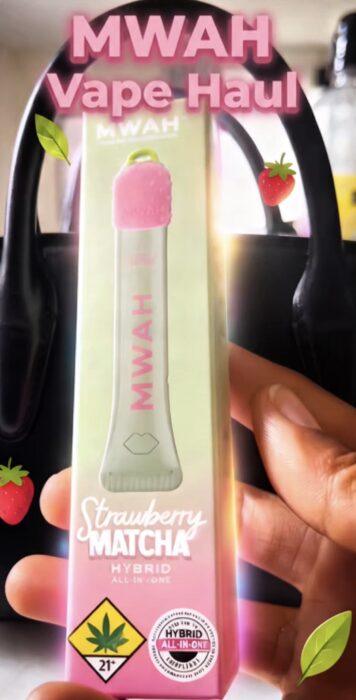
  • Strawberry Matcha
  • Watermelon Wifey

Strawberry Matcha and Watermelon Wifey are the newer additions, and Strawberry Matcha was the one I wanted most. It’s such a weirdly specific flavor for a weed vape that I’d been curious about it since I first heard about it. I also love the cute strawberry top on top of this device.

Seeing all eight together was honestly part of the appeal for me. The colors and names make them feel more like a little collection than eight versions of the same vape, but liking the way they look and actually liking the products are two different things. I’ve only spent real time with It’s Giving Guava so far, so I want to give each flavor enough time to judge the taste, smoothness and high before I decide which ones are actually worth coming back to.

Why the MWAH Design Works

Line them all up and the lip gloss influence gets even more obvious. Every vape is a different color, but they share the same tube shape, raised MWAH logo and lip detail on top. Show someone a photo without context and they’d probably assume it was a new makeup line. That’s still my favorite thing about them. Plenty of cannabis products lean on cute packaging, but the packaging usually stops mattering the second you pull the actual product out. With MWAH, the vape itself is the cute part.

They’re 1-gram rechargeable devices, and the lip is functional, not just decorative. Five clicks turns the device on or off, and two clicks activates the reheat function, so the beauty-product look doesn’t get in the way of the usual vape controls. The whole thing is just very committed to the concept. It’s not a regular disposable thrown into a cute box and called a day. The actual device looks like the beauty product.

Now I Actually Have to Try Them All

This is where the cute collection part stops helping me. I still have to figure out whether I actually like what’s inside all eight of them. I’ve decided to review the flavors one at a time instead of cramming eight mini-reviews into this post. If someone wants to know whether It’s Giving Guava is worth buying, I’d rather give them an actual review than three sentences buried halfway down a roundup.

I’ve already started with my MWAH It’s Giving Guava review, and I’ll add the others as I actually get through them. For these reviews I’m paying attention to the flavor, how smooth each one is, the kind of high I get and whether I actually want to keep reaching for it after the novelty of the packaging wears off.

The real question is whether I’ll like all eight as much as I like owning all eight. Challenge accepted!

Want to Try a MWAH Vape Yourself?

I bought mine at Kemp Cannabis in Seattle, but MWAH is sold through different dispensaries in CA and WA only. If you want to see whether they’re available near you, check the MWAH store locator and then confirm the current menu with the dispensary before heading over. Individual flavors can come and go, especially newer releases.

I’m excited to work my way through the rest of the lineup and see which flavors are actually worth coming back to. By the time I’m done, I should have a pretty clear favorite and probably at least one I only loved because it looked cute. Either way, buying all eight definitely gave me exactly what I wanted: the chance to see whether MWAH is as good to use as it is fun to collect. Watch my full MWAH lip gloss vape haul on YouTube by clicking the pic below!

Should I Use My Side Hustle Money to Pay Off Debt?

Should I Use My Side Hustle Money to Pay Off Debt?

Making extra money sounds amazing until it actually hits your account and somehow just disappears into your regular life. I’ve made money outside of my regular paycheck in a bunch of different ways over the years, some worth it, some honestly not worth the time I put in. But now that I’m trying to aggressively pay off debt, I’ve been thinking a lot more about what I actually want that extra money to do.

If I make an extra $100, $300, or $500 this month, should all of it go toward debt? Should I keep some for myself? And does an extra $100 even move the needle when the debt number is this big? That’s what I wanted to actually sit down and figure out.

Should All of My Side Hustle Money Go Toward Debt?

My first instinct is always yes, obviously, throw all of it at the debt and keep it moving. But real life doesn’t really work that clean.

First I have to figure out how much of that money is even mine to spend. Depending on where it came from, I might need to set some aside for taxes, or there might be expenses tied to whatever I did to make it in the first place. I don’t want to get so excited about sending an extra $500 to a credit card that I end up creating a whole new problem for myself later.

After that it really comes down to what I decided the side hustle was for in the first place. Right now one of my biggest goals is getting rid of debt, so yeah, I want a good chunk of extra money going toward that. But I also don’t buy into the idea that every single dollar I make has to immediately vanish into a credit card payment. If I worked for it and want to keep a little for myself, I can do that.

Maybe I decide 80% goes to debt and I keep 20%. Maybe some months I send all of it. Maybe part of it needs to go back into whatever made me the money in the first place. What I don’t want is to make an extra $300, let it just sit in my checking account with no plan, and then two weeks later have no idea where the hell it went. That’s the part I’m actually trying to change.

How Much Side Hustle Income Should Go Toward Debt?

Honestly I don’t think there’s one percentage that works for everybody. If the money has expenses attached, those come out first. If I need to set aside for taxes, that’s not part of the debt-payment budget either. I’m only interested in what’s actually left after all that, and from there I like picking a percentage before the money even comes in.

So if 80% of my usable side hustle income goes toward debt, a $500 month means $400 to debt and $100 for me. A really good $1,000 month means $800 to debt. I’m not renegotiating with myself every single time money shows up, and I can always change the percentage if life changes. It’s not a blood oath, it’s just a plan for the money. What actually matters to me is making sure more income actually improves my situation instead of just becoming more money I casually spend. I don’t want to make an extra $500 a month and somehow start spending $500 more a month, because then I’m just doing more work to stay in the exact same place.

Does an Extra $100 a Month Actually Make a Difference?

This one’s hard to believe when your debt balance is high. When you owe a lot, $100 can feel almost insulting. You send it, the balance moves a little, and you still owe a ridiculous amount of money.

But $100 a month isn’t just $100. It’s another $1,200 a year toward debt. $250 a month is $3,000. $500 a month is $6,000. And that’s before you even factor in the interest you avoid by knocking the balance down sooner. I’m actually working on a separate post that breaks down exactly what an extra $100 a month can do to credit card debt because I want to get into the real numbers. But the short version is I don’t think smaller extra payments deserve to get dismissed just because they aren’t dramatic. If $100 is what I’ve got, I’m using the $100.

Which Debt Should Get the Extra Money?

This gets more complicated once you’ve got more than one balance staring back at you. One option is putting extra money toward whatever has the highest interest rate, the debt avalanche method, which mathematically saves you more in interest because you’re going after the most expensive debt first.

The other popular option is the debt snowball, going after the smallest balance first. I get the appeal of both honestly. There’s something really satisfying about wiping an entire balance off your life and losing a whole minimum payment. But watching a card with a ridiculous interest rate eat my money every month also makes me want to go after that one first.

What matters most to me is that the extra money has an actual destination. If I’ve decided Card A is the target, that’s where it goes until I have a real reason to change the plan. Otherwise it’s way too easy to throw $50 here, $75 there, $100 somewhere else, and never actually feel like anything is moving.

Is Working More to Pay Off Debt Actually Worth It?

This is probably the question I care about most. I already have a job. I already have a life. I don’t want my solution to debt to turn into working every waking hour until it’s gone.

There are only so many hours in a day, and extra work costs something even when it doesn’t show up on a bank statement. It costs time, sometimes sleep, sometimes weekends or time with people I actually want to be around. And depending on the hustle, there can be real expenses too. So I don’t think every opportunity to make extra money is automatically worth doing. If I spend ten hours on something to make $60 after expenses, I need to actually decide if that $60 was worth ten hours of my life. Sometimes the answer is still yes, maybe I really need the $60. But I want to know what I’m trading before I say yes to it.

The side hustles I’m most interested in now are the ones that either pay enough to make the time worth it, can grow without needing the same amount of my time forever, or actually fit into my life without making everything else miserable. I don’t want to pay off my debt by building a life I hate living. I want the extra work to get me closer to needing less extra work.

See What Your Side Hustle Could Actually Do to Your Debt

This is exactly why I made the Side-Hustle-to-Debt Calculator.

I wanted to be able to plug in my actual debt balance, interest rate, and current payment, and then ask a simple question: what happens if I add my side hustle money on top of that?

TRY THE SIDE-HUSTLE-TO-DEBT CALCULATOR

You put in how much extra you’re making and choose what percentage you actually want to send toward debt, so you’re not pretending you’re going to throw 100% of it at the balance if that’s just not realistic for you. The calculator compares your current payoff timeline to what could happen once you add that extra income in, so you can see roughly how many months you could shave off and how much interest you could avoid. And you can just play around with it. Try $100. Try $250. Try $500. Try whatever you’re actually making right now. That’s way more useful to me than someone just telling me to “make more money.” I want to know what the extra money is actually buying me.

I Want My Side Hustles to Buy Back My Future Income

This is really what it all comes down to for me. I obviously want to make more money. But I don’t want the only result of making more money to be that I can afford to spend more money. I want some of it to actually change my financial situation.

Every debt I eliminate is one less payment taking a chunk out of my regular paycheck. One less minimum payment. One less balance collecting interest. One less company I owe money to every single month. Eventually that means more of the money I already make actually belongs to me.

That’s what I want the side hustle to buy. Not another bill. Not a more expensive lifestyle that requires me to keep hustling forever.

My own money back.

Should I Save Money While Paying Off Credit Card Debt?

Should I Save Money While Paying Off Credit Card Debt?

Trying to save money while also paying off credit card debt sometimes feels completely backwards. If my credit card is charging me a ridiculous amount of interest every single month, why on earth would I leave extra money just sitting in savings instead of throwing everything I possibly can at the balance? That’s the part I genuinely struggle with. I want this debt gone, and when I look at how much interest I’m paying, keeping money in savings feels like I’m sabotaging myself on purpose.

But the other option is leaving myself with absolutely nothing, and then the car needs something, the dog needs something, something in the apartment decides to break, or one of the million other things that cost money happens, and I’m right back to swiping the credit card I just worked so hard to pay down.

So for me the answer isn’t picking a side between saving money and paying off debt. I’m trying to figure out how to do both without being so cautious my debt barely moves, or so aggressive that one unexpected expense wrecks the whole plan.

Why I’m Not Sending Every Available Dollar to My Credit Cards

I love the idea of throwing everything at debt in theory. Get paid, pay the bills, keep exactly what I need to survive until the next paycheck, send everything else straight to a credit card. Very aggressive, very satisfying, right up until something happens, because something always happens.

If I send an extra $1,000 to a credit card and then get hit with a $700 expense I didn’t plan for, I need that $700 from somewhere. If there’s nothing in savings, odds are good it ends up right back on a credit card, and now I made this huge payment, felt like a whole finance queen for five minutes, and then added part of the balance right back on.

That’s exactly what I’m trying to avoid. I still want to be aggressive because high-interest debt is expensive and I’m not trying to drag this out forever, I just don’t think aggressive has to mean leaving myself completely exposed.

How Much Should I Keep in Savings While Paying Off Debt?

This is where financial advice starts getting annoying because there are so many random numbers floating around out there. Save $1,000. Save one month of expenses. Save three months. Save six months. Meanwhile I’m sitting here looking at a credit card charging over 20% interest thinking, you want me to leave HOW much sitting there while this thing eats me alive every month?

I get why a fully funded emergency fund matters, I really do, but I’m not convinced I personally need to wait until I’ve saved several months of expenses before I get serious about high-interest debt. What makes more sense for me right now is having enough of a cushion that one normal unexpected expense doesn’t immediately send me running back to a card.

And “enough” is going to look different depending on your life, obviously. Someone with an older car, kids, a house, inconsistent income, or one income holding up an entire household probably needs a bigger cushion than someone with way fewer financial responsibilities and rock solid income. This isn’t about hitting some perfect number because somebody on the internet said so. I just want enough sitting there that I can actually use it when something goes wrong without completely derailing what I’m doing with my debt.

Should I Use My Savings to Pay Off My Credit Cards?

This one is tempting, not gonna lie. If I have $5,000 sitting in savings and $5,000 sitting on a high-interest credit card, it’s hard not to look at those two numbers and think I could just make this whole problem disappear today. And depending on someone’s situation, using some savings to knock down high-interest debt might genuinely make sense.

What makes me nervous is the word all. Draining my savings all the way down to $0 just to watch a credit card hit $0 too would feel amazing for about a day, right up until I needed money for literally anything. Then what. If the answer is “put it on the credit card,” I didn’t actually solve anything, I just moved the problem around.

I’d rather figure out what I genuinely need to keep as a safety net first, and then decide if anything above that could do more for me against the debt. That’s probably not the mathematically fastest way to pay everything off, but I need a plan I can actually live with, not just one that looks good on paper.

Can I Save Money and Pay Off Debt at the Same Time?

This is what I’m actually doing. I’m not splitting everything perfectly down the middle, and I’m definitely not giving savings and debt equal priority right now, my debt is too expensive for that. But savings still gets a seat at the table.

When I get paid, I need to know what that paycheck actually owes me before I decide how much is going toward debt. There are bills coming out of it, I need money to live until the next one hits, something needs to go into savings, and I need enough of a buffer that I’m not budgeting myself down to my last $3 like it’s a personality trait. Then I can see what’s actually left for debt.

That number might not be as exciting as sending every cent I can find to a credit card, but it’s a lot more honest. And when I consistently have money left after handling all of that, that’s when I let myself get aggressive with it.

I Don’t Want My Debt Payment Creating More Debt

This is honestly the rule underneath everything else here for me. I don’t want to make a debt payment so aggressive that the payment itself is what forces me to go borrow money again.

If I already know I have $1,000 worth of expenses coming before my next paycheck, and I send that $1,000 to a credit card anyway because I want the balance to look better, that’s not discipline. That’s just me not leaving myself enough money for things I already knew were coming. The same goes for leaving myself no cushion at all.

I want my balances going down and staying down. That’s slower than the fantasy version where I send every spare dollar to debt and absolutely nothing unexpected happens for a whole year, but my life has never once agreed to follow one of my spreadsheets and I don’t expect it to start now.

Figure Out What Your Paycheck Can Actually Handle

This is one of the reasons I made my Paycheck-to-Debt Calculator. Instead of starting with “how much can I possibly send to my credit card,” it lets me start with what my paycheck actually needs to cover first.

I can put in my take-home pay, bills, everyday spending, savings contribution, the buffer I want to leave myself, and anything else that has to come out before the next paycheck lands.

TRY THE PAYCHECK-TO-DEBT CALCULATOR

Then I can actually see what’s left for debt without doing mental math every single payday. I can also play around with it, what happens if I put a little less into savings for a couple months, what happens if I find an extra $100 somewhere in the paycheck, what could consistently sending that toward debt actually do over time.

I don’t just want the biggest possible payment this Friday. I want a plan that lets me keep making progress next Friday too, and the Friday after that. If you want something that tracks all of this beyond just one calculation, I also built a Paycheck to Debt Command Center in Notion that does the same kind of paycheck breakdown but lets you actually manage it week to week instead of just running the numbers once.

I’m Trying to Stop the Cycle, Not Just Lower the Balance

Obviously I want my credit card balances lower, I want them at zero honestly. But I also don’t want to finally pay everything off and realize I never actually fixed the part where every unexpected expense turns into new debt. That’s why I’m keeping savings in the picture even while I’m being aggressive about the rest of it.

Maybe that means my payoff takes a little longer than it would if I emptied every account and threw all of it at the cards tomorrow. I’m okay with that if the tradeoff is having enough room to actually deal with life without immediately undoing my own progress.

I don’t need a perfect debt payoff plan. I need one that survives an actual Tuesday.

What to Do After Getting Laid Off: Your First 7 Days

Laid Off and Overwhelmed? Here's What to Actually Do in the First 7 Days

I’ve been at my current job for two and a half years, going on three now, and I do not take that for granted. Before this job, I got laid off from a company I actually loved working for, and it wrecked me more than some breakups have. I mean that seriously. I already deal with anxiety and depression, and losing that job did not just mean losing a paycheck. It meant losing a place I felt like I belonged, on top of suddenly having to make clear headed decisions about unemployment, health insurance, and next steps while my brain was doing everything it could to convince me I had failed at something.

That combination, grief over the job itself and the pressure to immediately function like a competent adult who has this handled, is what makes the first week of a layoff so brutal. Nobody warns you that you’ll be expected to fill out unemployment paperwork correctly while you’re also crying in your car. So this is the guide I wish someone had handed me back then.

When you get laid off, every single task feels urgent at the same time. Your income just changed, your routine is gone, and somehow you’re supposed to understand severance, unemployment, health insurance, bills, and job applications while you’re still processing what even happened.

Here’s the thing though. Not all of it has to happen today.

The first week isn’t about rebuilding your entire career. It’s about protecting the stuff that gets harder to fix the longer you ignore it: documents, deadlines, health coverage, cash, and access to information from your old employer. This is the plan I built from having actually lived through it, one that gives every decision its own place instead of dumping it all into one panicked pile.

A quick note before we get into it. Employment, unemployment, final pay, severance, and benefits rules all vary by state and by employer. Treat this as an organizational guide and confirm your specific deadlines with your state agency, plan administrator, HR department, or a professional who knows your situation.

Before you start, separate what’s urgent from what’s just loud

A layoff throws a long list of worries at you, but the loudest thought in your head isn’t always the most time sensitive one. You might feel pressure to apply to 30 jobs today, rewrite your entire LinkedIn, explain what happened to everyone, or decide whether it’s time for a whole new career.

That can wait. What generally can’t wait is saving your documents before you lose access to work systems, finding out when your paycheck and health coverage actually end, reading your severance paperwork closely enough to catch the response deadline, starting your unemployment claim, and figuring out how long your money can cover your actual bills.

Handle the deadlines first. The career reinvention can come later, once you know your immediate life is protected.

Day 1: Save your information and get the facts

Your first job isn’t applying for another job. It’s making sure you can still access what you need after your company shuts off your accounts.

Send yourself personal copies of anything you’re actually allowed to keep, to your personal email or a personal device. Don’t take confidential company info, customer data, or proprietary files, but do grab your separation or termination letter, the severance agreement and every attachment, recent pay stubs, your benefits summary and insurance contacts, performance reviews and any nonconfidential proof of what you accomplished, contact info for people who might serve as references, and any instructions about returning equipment or losing account access.

Before your access gets cut off, also do a few small things people forget in the moment. Screenshot or export any LinkedIn recommendations and Slack or Teams messages praising your work, since you will want that language later for your resume and you cannot get it back once you’re locked out. Save the personal cell numbers or emails of coworkers you’d want to stay in touch with, because company directories disappear with your login. And confirm your current mailing address is correct in HR’s system before you leave that conversation, since COBRA notices and other time sensitive mail will go to whatever address is on file, and a wrong address can cost you weeks you don’t have.

While you’re at it, ask HR directly for the dates that affect your money. When does your final paycheck arrive. How does your company handle unused PTO under their policy and your state’s law. Is severance on the table, and when do you need to respond by. What date does your medical, dental, and vision coverage actually end. When should you expect COBRA information. What happens to pending commissions, bonuses, stock options, or reimbursements. Who do you contact later about your 401k, HSA, FSA, or employment verification.

You don’t have to debate the layoff with HR in this conversation. You’re just there to leave with dates, documents, and contacts.

One thing I have to say as clearly as possible because it genuinely almost got me: check your mail. Actual physical mail, not just your inbox. COBRA election notices, severance paperwork, unemployment correspondence, and benefits deadlines still get sent by postal mail a lot of the time, and they will not wait for you to feel emotionally ready to open envelopes. I let mail pile up on my counter for almost two weeks during my layoff because I could not stand looking at anything that reminded me of it, and I nearly missed a coverage deadline because of it. Check it every single day during this first week, even the pieces that look like junk. Set a daily phone reminder if that’s what it takes.

Day 2: File for unemployment

Don’t wait until your severance runs out or your bank account gets uncomfortable to look at. Start with your state’s unemployment insurance program and let them tell you what you’re eligible for. The Department of Labor recommends contacting your state program as soon as possible after you become unemployed, since claims take time to process and you may need to complete weekly certifications or job search requirements while you wait.

Before you sit down to file, have your Social Security number, your employer’s legal name and address, your first and last dates of employment, your earnings info, the reason your employer gave for the separation, and your direct deposit info ready to go. Save your confirmation number, login info, filing date, and every single message the agency sends you. Filing the initial application isn’t the finish line, it’s the start of a process you’ll need to keep up with.

If your state or your company sets you up with a call or meeting with an unemployment or benefits caseworker to walk through your claim, do not miss it and do not let it get pushed to “whenever.” I cannot stress this enough. These caseworkers are often handling cases for dozens of people at once, and if you no show or ask to reschedule, you can end up waiting weeks to get back on their calendar, weeks you may not have before a filing deadline or certification window closes on you. Get the meeting on your calendar the moment it’s offered, put a reminder on it the night before and the morning of, and if you’re an emotional wreck that day like I was, go anyway. Write your questions down beforehand so you don’t have to think of them on the spot. If a meeting genuinely cannot happen at the scheduled time, call or email immediately, not the day after, to get a new one locked in before their calendar fills up. Losing that window is one of the most avoidable and most common mistakes people make in this first week.

Day 3: Pick a direction for health insurance

First things first, confirm the exact day your employer coverage actually ends. It might be your last day, the end of the month, or some other date buried in your plan documents. Don’t assume.

Then look at what’s actually available to your household. That’s COBRA or another continuation option through your old employer, a Marketplace plan through HealthCare.gov or your state’s exchange, getting added to a spouse or family member’s plan if that’s an option, or Medicaid or CHIP depending on your household income.

Losing job based coverage can qualify you for a Marketplace Special Enrollment Period, and HealthCare.gov says you generally have 60 days after losing coverage to enroll. COBRA gives you at least 60 days too, starting from whichever is later, the date coverage ends or the date you get the election notice.

Don’t just compare the monthly premium. Look at the deductible, what’s covered for prescriptions, whether your actual doctors are in network, any upcoming appointments you have, and what you’d realistically pay over the full year.

Day 4: Calculate your actual financial runway

This is the day you trade the vague fear of running out of money for an actual number you can work with.

Start by adding up what’s really available to you right now. Cash sitting in checking and savings, a confirmed final paycheck, confirmed severance and when it’s expected to hit, any unemployment benefits that are already approved (not just estimated), and any other reliable income coming into your household. Don’t build this number around a tax refund, hoped for freelance work, an unemployment amount you haven’t actually been approved for, or money someone else owes you.

Then list what it actually costs to keep your life running. Housing and utilities, food and essential household stuff, your insurance premiums, medication and necessary health expenses, transportation and phone and internet you need for work or job hunting, and your minimum required debt payments or court ordered obligations.

The CFPB’s guidance is to prioritize whatever protects your housing, income, insurance, and legal obligations, not whichever company happens to be calling the loudest. If you genuinely can’t make a payment, reach out to the company before you go quiet and ask what hardship options they actually have.

Once you have both numbers, divide the money you can safely use by your trimmed down monthly expenses. That’s your runway. It’s not a prediction of exactly how long you’ll be unemployed, it’s a planning window that tells you how aggressively you need to cut back and when you might need extra support. This is also the day to cancel or pause anything nonessential, redirect autopay off accounts that are about to get tight, and write down every due date so nothing sneaks up on you. Don’t panic pay down big balances before you actually know what the next few months need from you.

Day 5: Go back for the benefits and money you left behind

Getting laid off separates you from a company. It doesn’t automatically erase every account or benefit tied to that job, and it’s easy to lose track of what’s still yours.

Confirm where your retirement account is staying and how you’ll access it. Ask about your HSA access and any FSA deadlines for submitting expenses. Look into life or disability insurance conversion options if they’re offered. Check the vesting and exercise deadlines on any stock options or equity. Submit any reimbursable expenses you haven’t turned in yet, and make sure your mailing address is updated for tax forms.

Try not to cash out a retirement account just because it’s sitting there and available. The IRS is clear that a withdrawal can trigger income taxes, and depending on your age and account type, an early distribution penalty on top of that. Look at your options, leaving it in the plan, rolling it into a new employer’s plan, or a rollover into an IRA, before you decide anything.

Day 6: Build your job search foundation

Now you can actually start preparing to apply, without turning the whole day into a frantic scroll through every job with a salary attached.

Write down two or three job titles that genuinely match your experience and what you’re actually willing to do next. This keeps your resume, your search terms, and your applications all pointed the same direction instead of scattered everywhere.

You don’t need a totally different resume for every single application. Build one strong, accurate master version with your best results, then tweak the summary, skills, and most relevant bullets for whatever opportunity you’re actually serious about.

While your memory is still fresh, write down the projects you led or improved, any revenue, time, cost, retention, or quality results you can point to, the systems and tools you actually used, positive feedback or performance review language, and specific problems you solved. Update your LinkedIn enough that it reflects your latest role and makes you findable. You do not have to post a vulnerable layoff announcement unless you genuinely want to.

Day 7: Build a system you can actually keep up with

By day 7 you don’t need a job offer yet. You need a system that keeps deadlines, applications, and follow ups from living entirely in your head.

That means a short list of priority roles and companies, a realistic number of thoughtful applications you can actually keep up week to week, somewhere to log the job description, salary, date applied, contact, status, and follow up date, a weekly check in on your benefits and money, and dedicated time away from job searching so it doesn’t quietly become unpaid, all consuming labor.

The goal was never to prove you’re working hard enough to deserve another job. It’s to make good decisions over and over while protecting your energy and your household.

A calmer place to keep all of this

The hardest part of a layoff is that the information ends up everywhere. Benefits in one email, severance in a PDF, bills in your banking app, applications spread across browser tabs, follow up dates floating around in your head.

That’s exactly why I built the Layoff Survival Toolkit, a $7 Notion template made for people who just got laid off and need one calm place to organize benefits, deadlines, bills, financial runway, job applications, follow ups, and what the next 30 days actually look like.

You can absolutely build your own version of this in a spreadsheet or a notebook. The point isn’t the tool, it’s that you stop relying on memory during a week when your brain is already carrying too much.

What can honestly wait until after week one

Rewriting every line of your LinkedIn. Choosing a whole new career path. Buying a course or certification because you feel behind. Applying to every job you can find. Posting a public explanation of what happened. Making a permanent call on your retirement account without weighing the consequences. Pretending you’re fine so everyone else feels more comfortable.

Some of that might matter eventually. None of it matters more than your immediate deadlines, your coverage, and keeping yourself financially stable this week.

A few questions people usually ask


How soon should I file for unemployment after a layoff?

As soon as you can. Contact your state program right away, since eligibility and waiting periods vary and delaying your filing only delays the process. Keep up with any required certifications after that first claim goes in.

Should I sign my severance agreement right away?

Not just because it landed on your desk. Actually read the deadline, the compensation and benefits terms, the release language, confidentiality provisions, and any restrictions. If anything is unclear or the situation feels disputed, it’s worth getting legal advice before you sign.

How long do I have to pick health insurance?

It depends on the option. A Marketplace plan after losing job based coverage generally gives you a 60 day window. COBRA gives you at least 60 days too, starting from whichever comes later, losing coverage or getting the election notice. Always confirm the exact dates in your own paperwork.

Do I need to start applying for jobs on day one?

Not really. Protecting your documents, benefits, deadlines, and financial runway matters more early on. By the end of week one, aim to have a clear target, one strong resume, and a system for tracking things, so your applications are intentional instead of scattered.

What if I can’t pay every bill?

Prioritize whatever protects your housing, utilities, insurance, transportation, food, health, and legal obligations. Reach out to lenders and service providers before you miss a payment if you can, and ask what hardship options exist. Local help might also be available through 211, housing counselors, or state and community programs.

Final thoughts

Being laid off isn’t one task, it’s an emotional gut punch, a financial shift, a benefits transition, and eventually a job search, all layered on top of each other. Trying to solve all four at once is exactly how it starts feeling impossible.

For the first seven days, protect whatever has a real deadline. Save what you might lose access to. Find out exactly when the money and insurance stop. File the claim. Calculate your runway. Then build a job search system you can actually live with, not one you’ll abandon by week two.

I won’t pretend the anxiety and the grief go away just because you have a checklist. They didn’t for me. But having something concrete to hold onto on the days my brain was not cooperating is what got me through that stretch, and it’s the reason I’m two and a half years into a job I’m actually grateful for now. That part does get better, even when the first week feels like it never will.

You don’t need your whole future figured out by next week. You just need to see the next right step in front of you.